
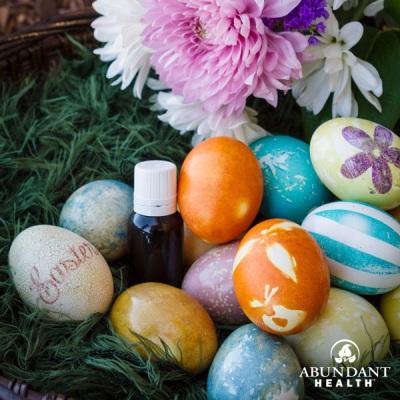
We’ve had a lot of fun creating Easter egg decorations that incorporate essential oils, and we want to share some of our ideas with you.
First, we tried making a number of different natural dyes from vegetables, fruit juices, spices, etc. We also experimented with adding essential oils to these dyes, but we found that the smell wasn’t very strong once the eggs were finished. Many of the natural dyes turned out great though! As you dye your eggs, you can even make designs by using a white crayon, electrical tape, flowers, or leaves. To make a flower or leaf design, just get the flower or leaf wet, place it on the egg, wrap the egg and flower or leaf up together in a section of nylon, and tie closed before dying.
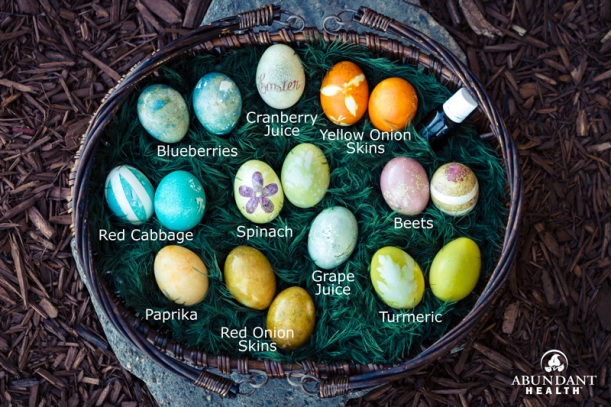
The dyes we used were from blueberries, red cabbage, beets, red onion skins, yellow onion skins, spinach, turmeric, paprika, cranberry juice, and grape juice. See the recipe below for how to make these dyes.
Next, we tried doing an essential oil transfer and transferred small images and text to some of the eggs by using orange essential oil. This worked great! You can find instructions for how to do this transfer in a previous post: Popsicle Stick Puzzles.
If doing this transfer on eggs, you can use colored ink (darker colors work best). Make sure to flip the image or text so it is readable once it has been applied. You will also want to keep your image or text between 1/2 inch to 2 inches for easy application. Honestly, it is a little tricky to get the image on the egg since the egg isn’t flat; but it can be done with a little pinching and cutting of the paper where the image and text don’t appear.
Lastly, we found that the best way to scent the eggs and turn them into diffusers was to simply mix a few drops of essential oil with a carrier oil (fractionated coconut oil, almond oil, and olive oil work well) and use the mixture to polish each egg. They smelled wonderful and looked shiny when finished!
Naturally Dyed Easter Egg Diffusers
Time: 1 hour active; 24 hours inactive | Difficulty: Moderate
Ingredients:
- Eggs (You can either use hard-boiled eggs or empty eggshells; but if you are using hard-boiled eggs for decorations, don’t plan on eating them later.)
- Flowers, leaves, white crayon, electrical tape, etc. for decorating the eggs (optional)
- Dyes (see below for natural dye suggestions)
- 1 Tbsp. carrier oil, such as Fractionated Coconut Oil, Sweet Almond Oil, or olive oil
- 10 drops essential oil of choice (we used flower oils such as lavender, ylang ylang, geranium, clary sage, etc.)
Instructions:
- Blow out your eggs by cutting out a small hole (a little bigger than a straw) in the bottom of each egg with a pin. Put a straw into the hole, and blow air into it so the egg comes out. Save the eggs to cook with later. Wash out each egg with water, and let dry overnight. Note: You can also use hard-boiled eggs and skip this step if you don’t care about eating the eggs later. Hard-boiled eggs are a little easier to decorate because they aren’t as fragile.
- Once your egg shells are dry, carefully add any decorations, such as flowers or leaves. You can also add designs by drawing on the egg with a white crayon or carefully placing electrical tape where you don’t want dye to cover. Be very careful when decorating if you are using empty eggshells because they are quite fragile.
- Prepare your dyes. If using natural dyes, see instructions below for each color. You will want to prepare your dyes in glass or metal dishes because they may leave stains.
- Place your eggs in the natural dyes, and let them sit in the refrigerator overnight. Note: We prepared our dyes in glass bowls and cups and then transferred the dyes to disposable plastic cups to let the eggs sit overnight. By doing this, we were able to use less dye to completely cover each egg.
- Once the eggs are dyed, remove them from the dye, and allow the egg shells to dry.
- Mix together the carrier oil and essential oil. Use a paper towel to polish the eggs with the oil mixture. Just dip the paper towel in the oil, and rub the oil onto the dry egg shells.
- Place your egg decorations wherever you desire, and enjoy the aroma they diffuse. If the scent dies down after a few days, you can add more essential oil by mixing more carrier oil and essential oil together and re-polishing the eggs.
Natural Dye Solutions:
Blueberries (Blue-gray) – 1 cup frozen blueberries mixed with 1 cup water. Bring to room temperature, and then remove blueberries.
Red Cabbage (Bright blue) – Cut 1/4 head of red cabbage into chunks, and add it to 4 cups boiling water. Stir in 2 Tbsp. white vinegar. Let cool to room temperature, and then remove cabbage.
Beets (Purple) – Cut 1 medium beet into chunks, and add to 4 cups boiling water. Stir in 2 Tbsp. vinegar. Let cool to room temperature, and then remove beets.
Grape Juice (Lavender or stone gray) – Use 1 cup grape juice.
Spinach (Light green) – Add a large handful of spinach to 2 cups boiling water, and let simmer for 15 minutes; strain. Add 1 Tbsp. white vinegar.
Red Onion Skins (Tan) – Use skins from 6 red onions, and simmer in 2 cups of water for 15 minutes; strain. Add 1 Tbsp. vinegar.
Yellow Onion Skins (Orange) – Use skins from 6 yellow onions, and simmer in 2 cups of water for 15 minutes; strain. Add 1 Tbsp. vinegar.
Paprika (Light orange) – Stir 2 Tbsp. paprika into 2 cups boiling water. Add 1 Tbsp. vinegar.
Turmeric (Yellow) – Stir 2 Tbsp. turmeric into 2 cups boiling water. Add 1 Tbsp. vinegar.
Cranberry Juice (Off-white or pink) – Use 1 cup cranberry juice.
Note: We added vinegar to all of the dyes, but the vinegar seemed to mess up the cranberry juice, grape juice, and blueberry dyes. Our result was less color and more of a bubbly effect. Try it with or without 1 Tbsp. vinegar for 2 cups of dye, depending on the color and effect you want.
One Comment
Leave a reply →