
Mother’s Day is quickly approaching! This year, give the special women in your life a handmade aromatherapy gift. Whether the mother in your life currently uses essential oils or not, she may love to keep a wonderful aroma around her with these personal diffuser pendants. And, even if she isn’t a jewelry person, you can give her a pendant diffuser that she can hang in her bathroom or closet instead!


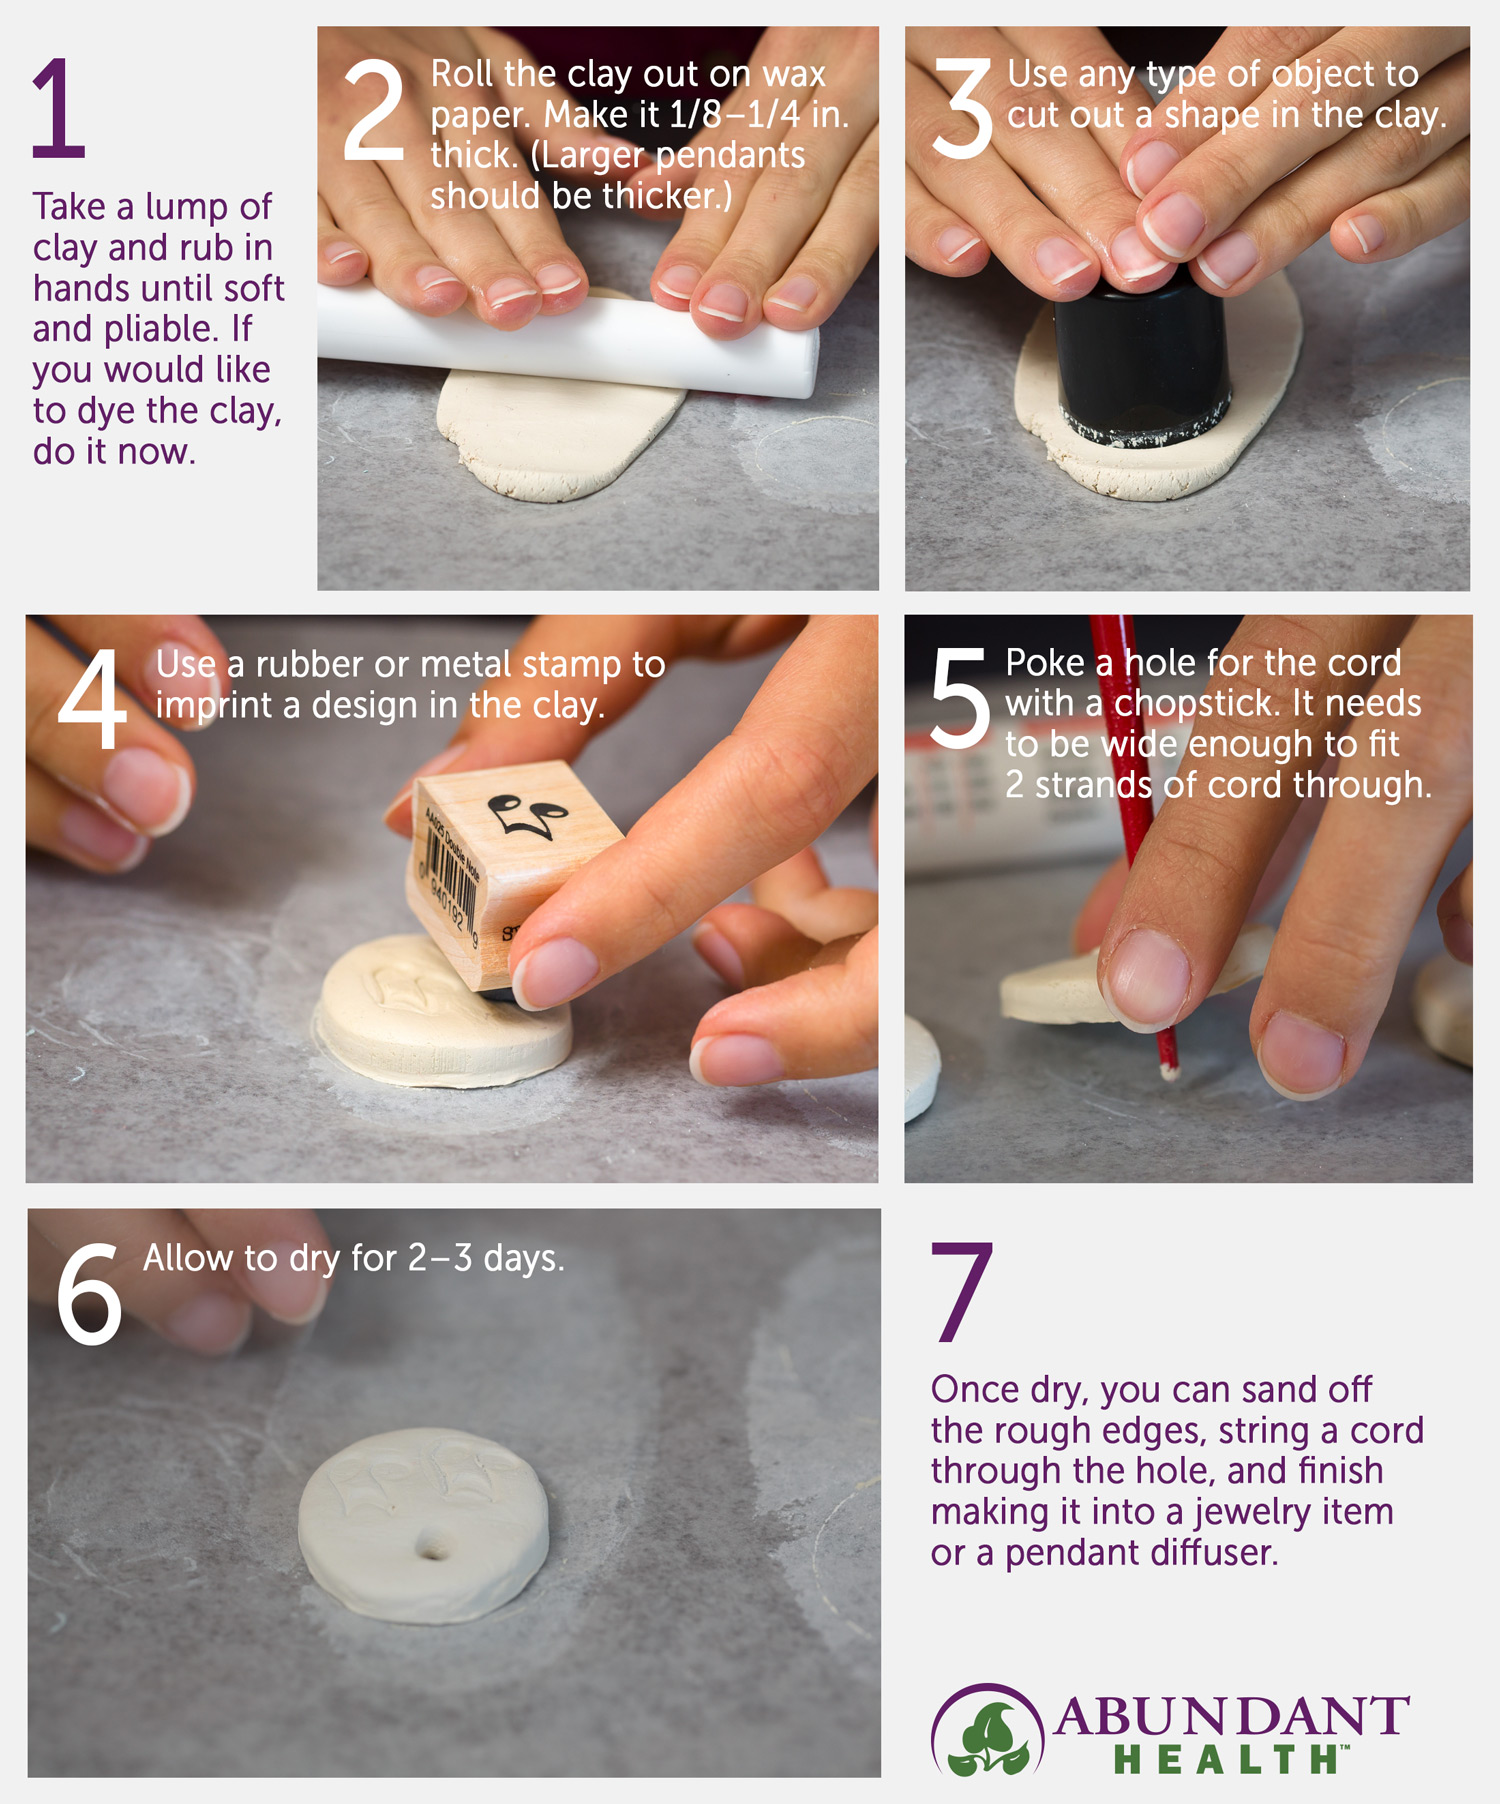
Though they may seem complicated, these clay pendants are really pretty simple to make. Here is a breakdown of the process:
When you are finished making these cute little diffusers, just add a drop of your favorite essential oil and allow the oil to soak in before wearing. Then enjoy the scent for 1–2 days. Once the scent fades, simply add another drop of oil.
If you are gifting this to someone who doesn’t have essential oils, you can give them some in a little sample bottle so they can use this pendant diffuser right away.

Aromatherapy Clay Jewelry
Time: 30–45 minutes active; 24–72 hours inactive | Difficulty: Easy
Ingredients:
- Air-dry white or terra-cotta clay (The Crayola Air-Dry brand works well.)
- Food coloring (optional; used for dying the white clay any color you desire)
- Rolling pin
- Cutout object (This can be a circular hairspray cap, small cookie cutters, or anything else to cut out the clay into the shape you desire. When making pendants for necklaces, you will want the size to be less than 1 1/4 inch in diameter. If you are making bracelets, you will want the size to be around 3/4 inch in diameter. Other stationary objects like bathroom diffusers can be larger.)
- Stamps (sized to fit the shape of your clay item)
- Chopstick or shish kebab stick (This is used to make a hole for the cord. It needs to be big enough to fit 2 strands of string through.)
- Wax paper
- Sandpaper (optional)
- Paints (optional)
- Ribbon, string, cord, or other jewelry-making materials
- Essential oil(s)
Instructions:
- Lay out a section of wax paper on a table to create your work station. This will help with cleanup and make it easier to roll out the clay and move the pieces.
- Optional step: Take a glob of the clay and color it using food coloring if desired. (Note: The clay always dries to be a lighter color.) (*Helpful hint: to make sure the food coloring stays in the clay and doesn’t drip off, create a well in the top of the piece of clay with your finger, drop only 2 drops of coloring in the well at a time, fold the clay so it closes over the well opening, and then continue to knead the clay as normal. If it starts to feel dry, just add a few drops of water.)
- Roll out the clay on the wax paper. You want it about 1/8–1/4 inch for pendants smaller than 1 1/4 inches. If you are creating larger pendant diffusers for a small room, you may want it to be thicker so it doesn’t break as easily.
- Use your cutout object to cut out the pendants. With the remaining clay, you can form beads by rolling it into small pieces and poking a hole through them with the chopstick or other stick.
- Stamp your design on the pendants, and poke a hole through each of them for the cord with the chopstick or other stick.
- Transfer pendants and beads to a paper plate, and allow them to air dry for 2–3 days.
- Once dry, you can sand rough edges with sandpaper, decorate with paint, and/or finish making them into a piece of jewelry.
- When figuring out the length of cord you will need, position the cord around the wrist or neck to the length you desire. Then cut double the length you think you will need. (You can always cut more off if it ends up being too long. We have found that adding any beads or knots takes up more string than you think it will).
- Put the ends together, creating a loop at the other end. String the pendant through the loop and the cut ends through the loop, securing the pendant in the middle before adding any beads.
- If desired, a bead can be used to make a clasp for a necklace or bracelet by tying the bead to one side and making a loop big enough to go around the bead on the other side and securing it with a knot.
- To use, simply place a drop of essential oil on the pendant, and rub the oil around. After a minute, the clay should have soaked up the oil and begun to diffuse. Reapply oil as the scent fades.
One Comment
Leave a reply →